Camo Car Magic: Installing and Maintaining Wraps for Ultimate Appeal

Camo Car Magic: Installing and Maintaining Wraps for Ultimate Appeal

Sino Group is a professional customized graphic car wrap vinyl sticker manufacturer and wholesale supplier, kindly get factory price of: printed pattern auto vinyl wrap, camo vinyl car wrap, gradient color change car wrapping film.

Share This Post

What is the process of installing a camo wrap on a car?

Installing a camo wrap on a car involves a series of steps that require careful preparation, skill, and attention to detail. Here’s a general overview of the process:

1. Vehicle Preparation:

– Clean the vehicle’s exterior thoroughly to ensure there is no dirt, dust, or debris on the surface.
– Remove any parts or components that might hinder the wrapping process, such as mirrors, door handles, and trim pieces.
– If necessary, perform paint correction to address any imperfections on the car’s surface.

2. Design Selection:

– Choose the camo design and colors you want for your vehicle. This could be a pre-designed pattern or a custom design created with the help of a design team.

3. Material Selection and Cutting:

– Choose a high-quality vinyl wrap material suitable for automotive use. The material should be designed to withstand outdoor elements.
– Based on the design and dimensions of your vehicle, the vinyl sheets are cut to the appropriate size and shape using precision cutting tools.

4. Application of Vinyl:

– Start with one section of the vehicle at a time, usually starting from a less visible area like the door jambs or the bottom of the car.
– Peel off a portion of the vinyl backing and align the edge of the vinyl with the corresponding edge of the vehicle’s surface.
– Slowly apply the vinyl, smoothing it out with a soft squeegee or application tool to prevent air bubbles or wrinkles.
– Work your way across the surface, ensuring the vinyl adheres smoothly and evenly to the curves and contours of the car.

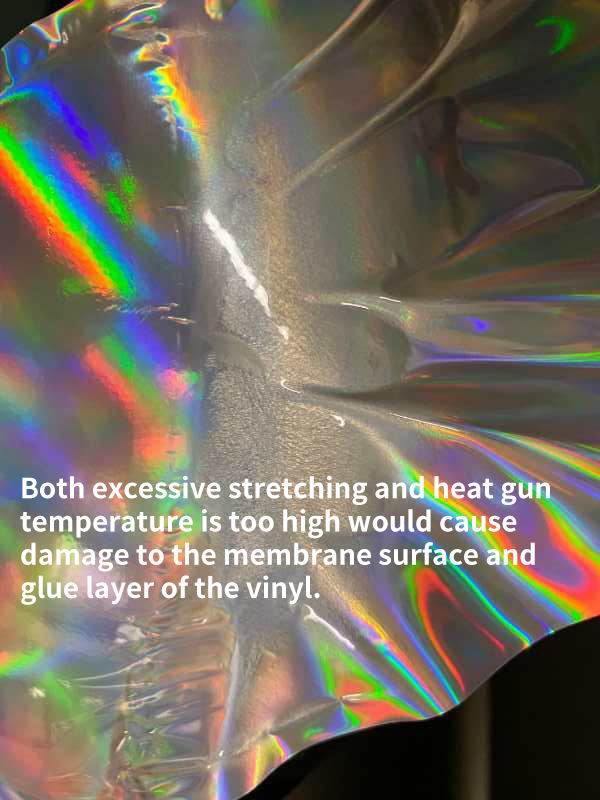
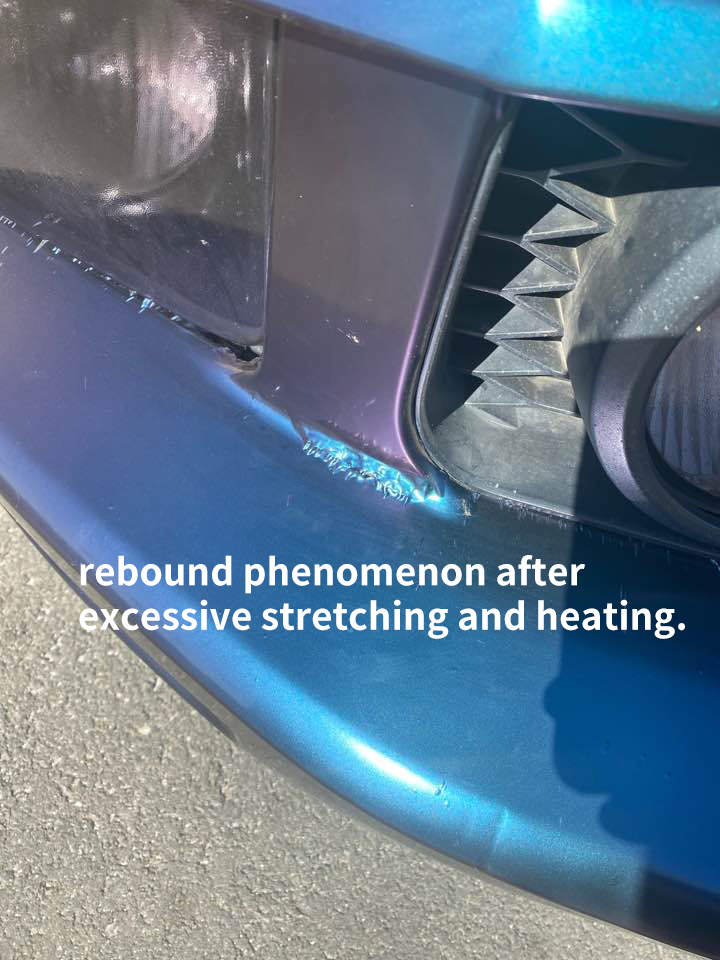
5. Stretching and Heating:

– Vinyl wraps often require stretching to fit around complex curves and angles. A heat gun is used to soften the vinyl, making it more pliable for stretching and shaping.
– Careful heating and stretching ensure the wrap conforms to the vehicle’s shape without excessive tension or distortion.

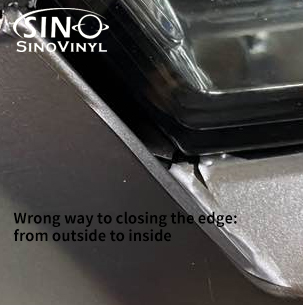
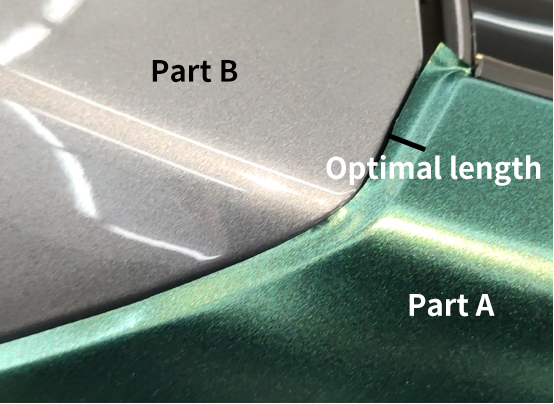
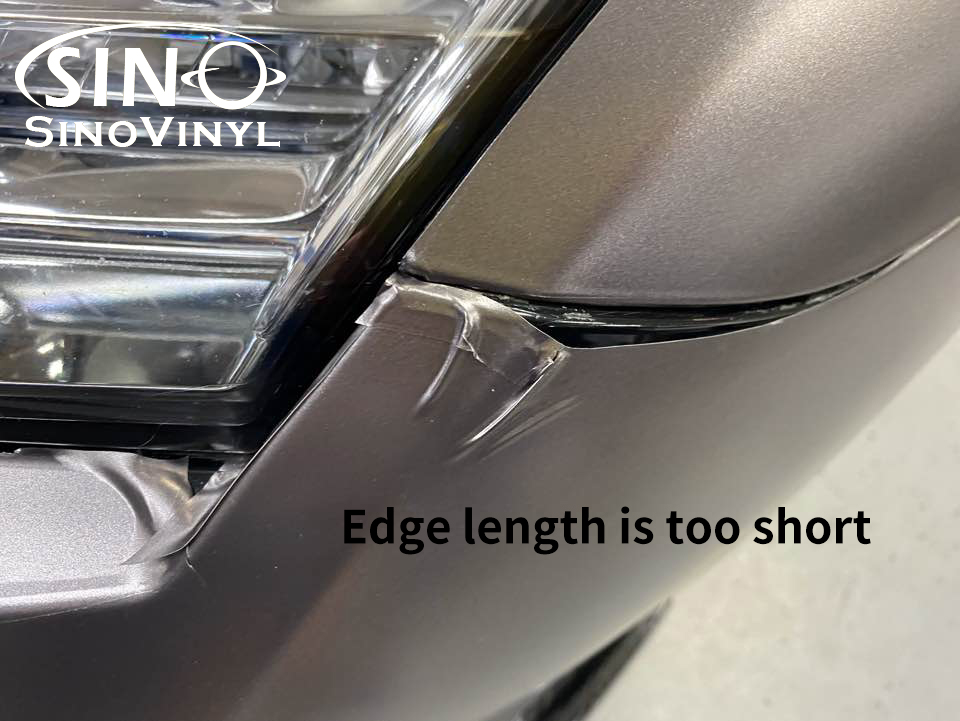
6. Seam and Edge Tucking:

– In areas where multiple pieces of vinyl meet or where the wrap needs to be tucked into crevices, careful tucking and trimming are performed to create clean seams and edges.
– This process ensures that the wrap looks seamless and professional.

7. Trimming and Finishing:

– After the wrap is fully applied, excess vinyl is trimmed carefully along the edges and seams for a neat and precise finish.
– Any components that were temporarily removed, such as mirrors and door handles, are reinstalled.

8. Post-Installation Inspection:

– Inspect the entire wrapped surface to ensure there are no air bubbles, wrinkles, or imperfections.
– Use a heat gun to address any small imperfections or to ensure the vinyl conforms perfectly to the vehicle’s contours.

9. Curing and Setting:

– The vinyl wrap needs time to fully adhere to the car’s surface. This process is known as curing or setting.
– It’s important to avoid washing the car or exposing it to moisture during this curing period.

10. Final Quality Check:

– Once the vinyl wrap has fully cured, conduct a final quality check to ensure that the installation is flawless and the design aligns properly.

It’s worth noting that while the above steps outline the general process, installing a camo wrap requires a certain level of expertise. Many individuals opt to have their camo wraps installed by professionals to ensure a high-quality and long-lasting result.

Can a camo wrap be applied to any type of vehicle?

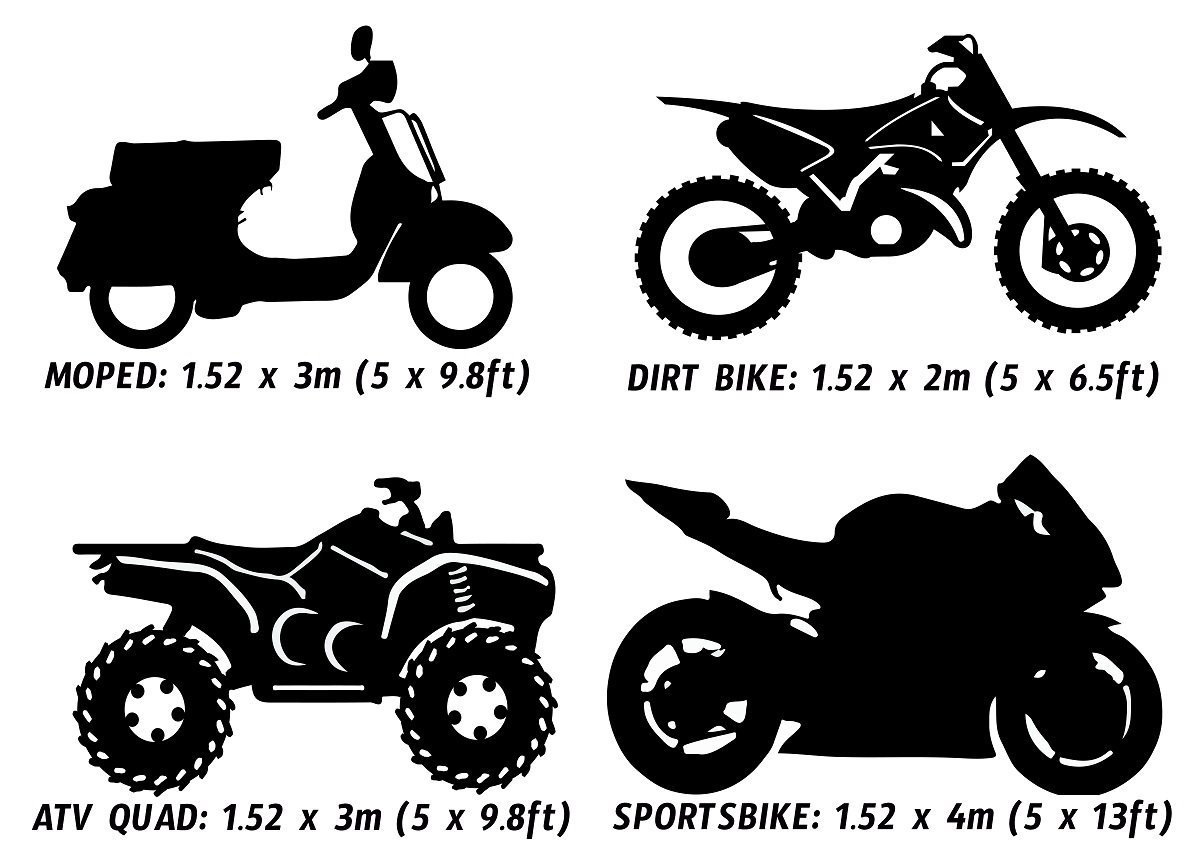
Typically, a camouflage wrap has the versatility to be affixed to a variety of vehicles, encompassing cars, trucks, SUVs, motorcycles, boats, and even recreational vehicles (RVs). The adaptability of the wrap material and the expertise of the installers both contribute to how effectively the wrap can conform to diverse vehicle shapes and sizes. However, there are a few considerations to keep in mind:

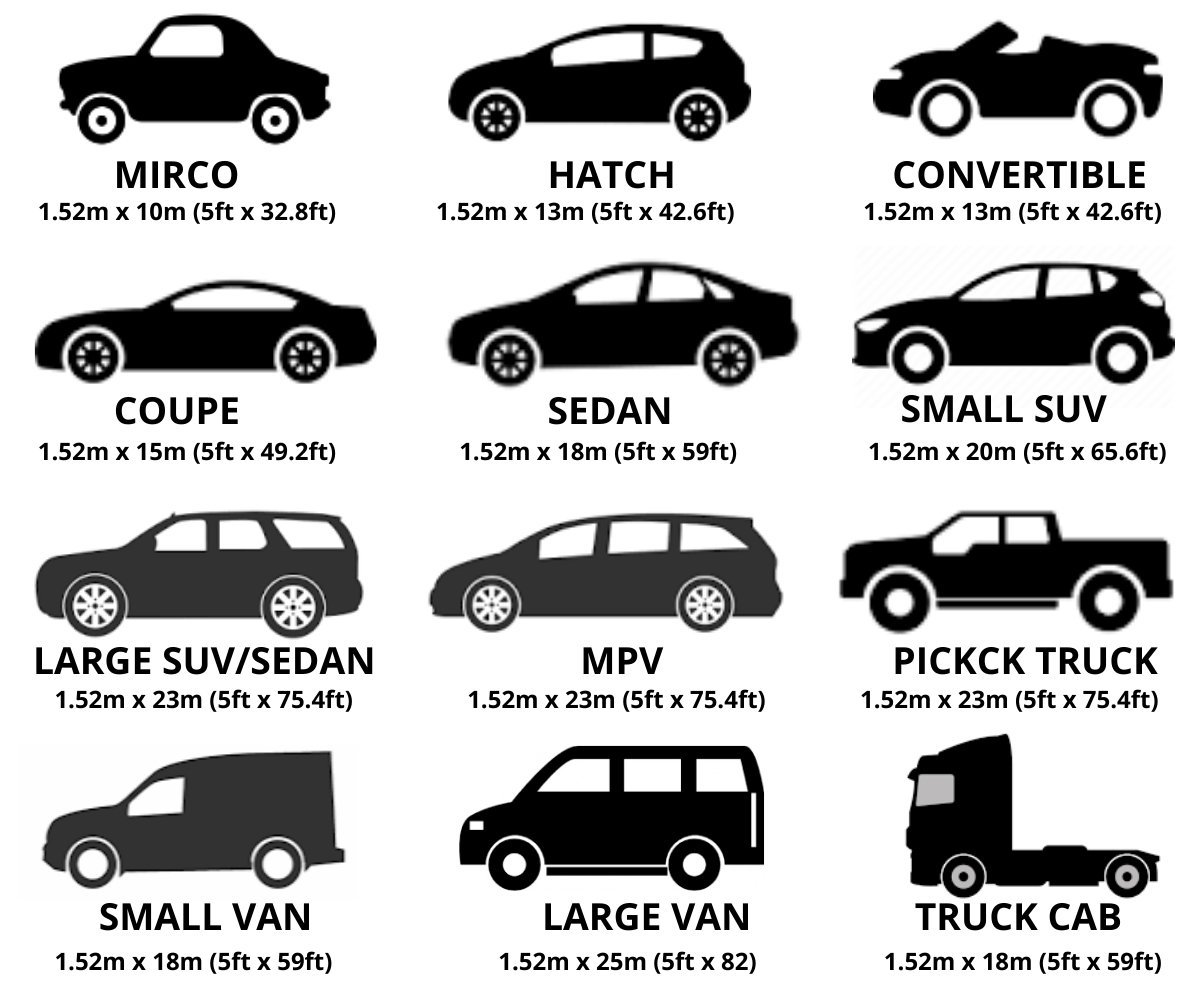
1. Vehicle Size and Shape

While most vehicles can be wrapped, the complexity of the vehicle’s shape can affect the ease of installation. Some vehicles with intricate curves, sharp angles, or complex bodywork might require more skill and effort to properly apply the wrap.

2. Surface Material

Camo wraps adhere well to smooth surfaces like metal and glass. Vehicles with textured surfaces, such as rugged off-road vehicles, might require extra attention during installation to ensure proper adhesion.

3. Preparation

Proper surface preparation is crucial for a successful wrap installation, the vehicle’s surface needs to be thoroughly cleaned, free from any debris, oils, or residues. Any imperfections or dents should be addressed before applying the wrap.

4. Durability

The type of vehicle and its intended use can impact the durability of the camo wrap. Off-road vehicles that encounter rough terrain and harsh conditions might experience faster wear and tear compared to a car that primarily drives on city streets.

5. Professional Installation

While some experienced individuals might attempt to apply a camo wrap themselves, it’s often recommended to have a professional wrap installer handle the job.

6. Removability

Most camo wraps are designed to be removable without damaging the vehicle’s original paint. Nonetheless, specific elements such as the caliber of the wrap material, the duration the wrap has been adhered to the vehicle, and the proficiency of the installation can influence the ease of removing the wrap.

7. Licensing and Regulations

Depending on where you live, there might be regulations governing the use of vehicle wraps, especially if they involve certain colors, reflective materials, or patterns.

How do you maintain a camo wrap to ensure its longevity and appearance?

Maintaining a camo wrap is essential to ensure its longevity and appearance. Here’s a step-by-step guide on how to properly care for your camo wrap:

1. Regular Cleaning:

– Wash your camo-wrapped car regularly using a mild car wash soap and clean, soft microfiber cloths or sponges.
– Use a two-bucket wash method to prevent dirt and debris from scratching the wrap.
– Avoid using abrasive brushes or harsh cleaning chemicals that could damage the wrap.

2. Hand Washing:

– Hand washing is recommended over automated car washes, as the brushes and strong chemicals in automated washes can potentially damage the wrap.
– If using an automated wash, choose one that is specifically designed for vehicles with wraps.

3. Avoid High Pressure:

– Do not use high-pressure washers directly on the edges of the wrap or in areas where the wrap may have lifted slightly.
– High-pressure water can cause the edges to lift further, potentially leading to peeling.

4. Drying:

– After washing, use a clean microfiber cloth to gently pat the wrap dry. Avoid wiping vigorously, as this could cause friction and potential damage.

5. Waxing and Sealants:

– You can use a non-abrasive, high-quality wax or sealant designed for vinyl wraps to protect the wrap’s surface and enhance its appearance.
– Apply wax or sealant by hand using a soft applicator pad. Follow the product instructions for best results.

6. Avoid Direct Sunlight:

– Prolonged exposure to intense sunlight can fade the colors of the wrap over time. Whenever possible, park your vehicle in shaded areas or use a car cover.

7. Avoid Harsh Chemicals:

– Do not use abrasive or acidic cleaners, solvents, or petroleum-based products on the wrap, as they can damage the material.

8. Bird Droppings and Tree Sap:

– Remove bird droppings, tree sap, or any other contaminants promptly, as they can deteriorate the wrap’s finish if left for too long.
– Gently soak the area with warm water and use a soft cloth to gently wipe away the residue.

9. Careful Handling:

– Be cautious while opening doors and using trunk lids to avoid causing excessive friction on the edges of the wrap.
– Avoid using sharp objects near the wrap that could potentially scratch or puncture it.

10. Storage and Winter Care:

– If storing your vehicle for an extended period, consider using a breathable car cover to protect the wrap.
– During winter, remove ice and snow carefully using a soft brush or a snow brush designed for car surfaces.

11. Regular Inspection:

– Regularly inspect the wrap for any signs of lifting, bubbling, or damage. If you notice any issues, address them promptly to prevent further damage.

Remember, proper care and maintenance will significantly extend the life of your camo wrap and keep your car looking great. If you’re unsure about any specific cleaning products or techniques, consult with a professional who specializes in vehicle wraps for personalized advice.

                       (Click the picture to learn more)

You May Interest

https://carlikewrap.com/collections/camouflage-vinyl

https://www.sinovinyl.com/products/camouflage-vinyl/

https://sinocarsticker.com/category/products/camo-vinyl-wrap/

Professional Car Vinyl Wrap Film Supplier

  1. Leading manufacturer in China
  2. 10+ years experience produced car wrap vinyls
  3. Over 30+ series and 500+ colors
  4. Free sample swatchs supply
  5. Flexible OEM & ODM design
  6. Quality control and stability
  7. Reasonable price and fast delivery
  8. Premium customer service

Our Happy Customer

what our clients have to say

Please Leave Your Information

We would be happy to hear you and learn all about you.

*We respect your confidentiality and all information is protected.

Customized Car Vinyl Wrap FAQ

The customized car vinyl wrap is made by high precision printing.

  1. Design the graphic
  2. Face film: high polymeric white pvc vinyl with 1440 DPI high precision epson printer
  3. Adhesive glue: high quality low tack initial adhesive glue, do not damage the car paint after remove
  4. Release paper: super density air release channels, easy to install on car
  5. Protection film: UV proof transfer lamination film on the face film to protective the graphic
  6. Outdoor durability: 2 years

Here we have a formula to calculate how much vinyl is needed for a car wrap:

*length of your vehicle x 3 (for the two sides & the top of the vehicle from front to back) + extra for bumpers and mistakes (1.5m to 3m depending on complexity of car and your skill level)

For example:
2019 BMW 530i M: (4,954mm x 3) + 3m = 14.86m + 3m = 17.86m
the closest roll size is a so purchase a 1.52m x 18m 5ft x 60ft roll.

♦ Small size cars can be fully wrapped with 15m to 17m of vinyl.
example of vehicle sizes:
Audi A3 & A4, BMW 2 & 3 series, Mitsubishi Lancer, Subaru Impreza, VW Golf & Beetle & Jetta, Hyundai Elantra, Nissan Sentra, Mercedes C-class

♦ Midsize cars can be fully wrapped with 18m to 20m of vinyl.
examples of vehicles:
Audi A5 & A6, BMW 5 series, Mercedes E-class, Hyundai Sonata, Toyota Camry, Honda Accord, VW Passat & CC, Nissan Maxima/Altima, Ford Mustang, Corvette, Chevrolet Camaro

♦ Full-size cars; small SUVs, small trucks & small vans need 20m to 23m of vinyl
examples of vehicle sizes:
Audi A7 & A8, BMW 7 series, Mercedes S class,

♦ Full-size SUVs, trucks & minivans 23m to 30m of vinyl
examples of vehicle sizes:
Mercedes GLS, Suburban, Escalade, Land Rover, Cayenne, Hummer, H2, Voyager, Town & Country, Sienna, Routan


Does NOT devalue the resell value of your car like a paint job does.
Vinyl car wraps protect your OEM paint and are 100% removable.
Warranties and/or lease agreements remain valid. Painting can void warranties, increase the cost of insurance, and is not even an option with a lease
Cost for a vinyl vehicle wrap is considerably less than a comparable paint job.
Vinyl car wraps wear as well as, or better than paint – when properly cared for. Think of it like a skin for your laptop or a silicon cover for your phone. The vinyl can take a beating protecting the vehicle’s paint underneath.
Vinyl car wraps come in any color, even custom, and can have a matte, semi-gloss, gloss, brushed steel, carbon fiber, metallic flake, matte metallic, chrome and even leather-like finishes.
Expensive, color-matching paint fees are unnecessary for scratches or accident vehicles; just re-wrap the section that needs repair.
It’s difficult to tell it’s not paint. Due to our paint wrapping technique, it literally looks like it was sprayed on.
Affordably customize parts of your car. You don’t have to wrap your entire car; just your hood, roof, mirrors, stripes, etc.
Matte-paint jobs can be brittle and chip easily while vinyls are more durable and harder to scratch. In the event that repairs are needed, the part that was damaged can be easily replaced, providing a perfect match.
Hides dings or scratches and “freshens” the look of your vehicle.

Applying specialist car wrapping film to your car body will not damage your paintwork. However If you already have stone chips, abrasions or rust patches on your paintwork it’s important to remember that when the vinyl is removed it may pull loose paint off with it.

Yes, if you have your design and idea, you can send the graphic files and car model, then we can printing the vinyl for you to wrap the car.

The customized car vinyl wrap material normal size is 1.52×18-23m for a full roll, based on your car size, the price is from US300-500 per roll.

Please send contact us to get more informations.


How to customized car vinyl wrap?

Car vinyl wrap training has become a fashion, making cars look cooler and full of mystery. This also attracts many car owners to follow suit to their car vinyl wraps. Car vinyl wraps require a lot of professional knowledge, which is not a small shop. Therefore, try to go to a professional car beauty shop to avoid the misunderstandings in the film, and understand the method of using the car after the film.I will teach you how to close the film immediately after the film is finished. Today I will show you how to take a film and take action.

1. Thoroughly clean the vehicle and carry out deep cleaning for oil stains and mud. The possible places are corners, bottom edges, handles, under the front and rear bumpers, including the dead corner of the upper guard plate of the hub. The air compressor blows away the dirt and sewage remaining in the gaps of the corners to avoid the situation that the film will not be stuck and will cause the edge to be raised later.

2. After the film is finished, all the corners should be baked with a hot air gun at high temperature. While baking, compact the shape by hand until the baking heat no longer starts. For the parts that are easy to be edged or the glue does not stick to the edge that has been edged, it can be appropriately reinforced with adhesion promoter or super energy glue.

3. After the color change is completed, it needs careful care in a short period of time, for example, the cleaning of the vehicle needs to be carried out after a week, and it cannot be directly sprayed at the seam between the film and the car paint with a high-pressure water gun; it cannot be pasted with items such as adhesives To the membrane surface, and can not use a brush, abrasive or sponge with abrasive to clean the membrane surface.

It needs to make sure if the car has been waxed, painted, crystal coated or not before doing the car wrapping job. It would hurt the car paint to some extent when removing the car wrap vinyl if the car has been repainted before. It is best to be the original car paint intact before doing the carwrapping job.When the car body have Scratches, damages, it needs to solve this problems first, because it is not good to car wrapping.

1. Need to wash and clean the car body before the car wrapping job. Using alcohol to wipe and clean it once again when attaching the vinyl for a certain part of car body.

2. It is better to wrap a complete vinyl to one part of car body,reduce splicing.Correct direction of closing vinyl edge is from outside to inside.

Car Vinyl Wrap Tips: How to complete a perfect film for your car?

3. Edge-closing distance: when there is a gap between theparts A and part B(like below pictures shows), when the A-side is closing, the optimal length of the edge of the remaining film is: the length of the edge of the part A to the edge of the part B.

Car Vinyl Wrap Tips: How to complete a perfect film for your car? Car Vinyl Wrap Tips: How to complete a perfect film for your car?

4. At the top part of the car, make sure all the vinyl at the edge are embedded in the black strip(Like the red arrow below).

Car Vinyl Wrap Tips: How to complete a perfect film for your car?

5. When the edge is attached with a curvature and no stress point, the direction of stretching should be stretched to the vertical direction of the gap (as shown in the picture below, the edge needs to be retracted in the direction A, but it should be stretched downwards, that is, the direction B, this stretching method can prevent the car vinyl from being intact when it is just wrapped, but the phenomenon of stretching and rebound occurs at high temperatures).

Car Vinyl Wrap Tips: How to complete a perfect film for your car?

6. Don’t stretch when wrapping the vinyl,but if it must need to stretch, don’t overstretch please. Both excessive stretching and heat gun temperature is too high would cause damage to the membrane surface and glue layer of the vinyl.(The heating temperature of the heat gun is recommended to be 80-120℃; but the recommended temperature for chrome mirror vinyl,chrome laser vinyl and mysterious chrome rainbow vinyl is below 80℃).

7. When sticking to a location with a large arc,first bake and soften the vinyl, avoid rebound phenomenon after excessive stretching and heating.

8. Use the heat gun to heat up the edge when the part is finished wrapping,to see if there has phenomenon of membrane rebound.(Especially the position of stretched edge)

9. After the whole vehicle is wrapped , please use the heat gun to reheat all the edge trimming positions, to make sure the edge of vinyldoes not rebound.

10. Precautions within three days after wrapped vinyl:avoid car washing; Do not use a water gun to spray the film at the seam,especially the edge part , don’t let the car get wet in the rain.

    1. Initial Low Viscosity Glue refers to the initial viscosity of the vinyl and the paint surface,back adhesive is pressure sensitive adhesive; due to the initial viscosity of the vinyl and the paint surface is not very high during the wrapping, it feels not very sticky when you peel off the bottom paper and stick it to the adhesive by hand.If the car body has been repaired by car paint before vinyl wrapping, use a high-viscosity vinyl on the painted surface, and then tear it immediately, you can find it is very laborious, and it is easy to tear the car paint together.The use of a low-viscosity car film will not easily bring up the paint surface even after repeated tearing, which is very convenient for car wrapping job.

    2. For cars that have just finished the initial low-viscosity car vinyl wrapping, it is better not to wash the car within 3 days, due to the low initial viscosity glue and the paint surface are not completely adhered, it can prevent the water gun from flushing the corners of vinyls.After three days, the viscosity gradually increases,it should let the car owner to come and check the corners of vinyls at that time.After wrapped the vinyl for a period of time, the glue surface has completely adhered to the paint surface. If the paint is dropping during the tearing process, it has no relationship with the quality of the film,but caused by the thickness of the paint surface;if paint dropping due to tearing during filming during the car wrapping process, then there is a certain relationship with the quality of the car wrap vinyl.

    3. The method to Judge vinyl glue: Take the vinyl samples or color swatch books, tear off the bottom paper, stick it to the paint or the hand, and then peel it off.If found that with very high adhesion, that one is high viscosity glue; the one with very low adhesionis Initial Low Viscosity Glue.

    4. Avoid sticking items with strong viscosity to the vinyl surface.

    5. Avoid using cleaning tools, which is easy to damage the surface of the car color change vinyl. Please don’t use brush abrasives, abrasives or sponges with abrasives to clean the vinyl surface.

    6. Please use soft damp cloth and clean water to wipe the surface of the vinyl. It must need to use neutral cleaning agentwhen using it to clean the car wrap vinyl.

    7. When the edge of vinyl is slightly uping , please processed in the car wrap store within 24 hours.

Get Started With SINOVINYL Now

Welcome to get customized car sticker vinyl wrap material offer and to be the distributor of SINOVINYL.

small_c_popup-1-1.png

Ask for Sample Now

small_c_popup-1.png

Ask for Quote Now

We Would Be Happy To Assist You

small_c_popup.png

Download Our Full Catalog

We Would Be Happy To Assist You